


This is mostly a response to jazzy from in the New Escort Mount Pictures thread. I didn't think it would be polite to hijack it with something this involved.
Yeah, I tried the 3M dual lock sandwich deal but I could never get the mount to stay in there no matter how I tried to cut out the little locking tabs. Having sketchily mounted hunks of plastic near my head wasn't acceptable, so I made this.Originally Posted by <<JAZZY>>

This is not my invention, but I forget where I saw it first. As for how it's done, I pretty much eyeballed it so I don't have exact measurements or screw sizes, but this is how I did it...
* Purchase a strip of aluminum at the hardware store. I used 1/8" thick by 1 1/2" wide. It comes in lengths much longer than what you need, but that's life. You could use a thicker piece, but I haven't had any problems.
* Purchase sheet metal screws. I just brought the mount into the store and picked ones that looked like they'd work. They have a round head (obviously) and a little flange that serves to hold the mount in place.
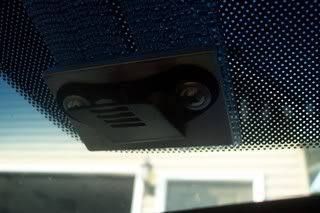
- Use the mount as a template to mark where the screws will go in. It needs to go as far back on the mount as possible, because the edge of the detector actually touches the aluminium, not the windshield. Mine doesn't look like that because I didn't think about it until it was done, but luckily it worked out that way. The whole assembly is way too thick for the detector to touch the windshield without looking like a Cobra.
- Drill pilot holes for the screws. They should be just a tiny bit smaller than the inside of the threads or you'll never get the screws in.
- Drive in the screws.
- Remove the screws and put them back in with the mount.
- Cut off the excess threads of the screws with a Dremel cutoff wheel. You can remove the screws and because you already made the threads in the aluminium by screwing them in, they'll go back easily in later on.
- Use the mount as a guide for where to draw a line to cut off just the little piece of aluminum you're going to use with a hacksaw. You're doing this now because it was easier to handle the big piece of aluminium than a small one when drilling and screwing.
- File your rough edges.
- Clean the back of your new mount with mineral spirits or similar. Clean the windshield too.
- Cut a single strip of 3M dual lock in half and attach the two halves to the mount.
- Lock together two more pieces of dual lock to the dual lock already on the mount, remove the protective strips, and attach the whole deal to the windshield. This method ensures the pieces fit together right and are straight.
- Carefully pry the aluminium part off of the windshield and work out any air bubbles in the tape on the windshield. According to the package, It's a good idea to let it set for at least a few hours before putting the detector up.
- If you used two full pieces of dual lock on the windshield, you have flexibility in being able to adjust the height of the detector when you put it up.
- Optional: I went to the craft store and bought some of those little rubber "dots" that go on the backs of picture frames to keep them off the wall and put two of them on the top front edge of the detector. The detector fits nice and tight in the mount and doesn't bounce around at all.
|
|

|

 Reply With Quote


Bookmarks